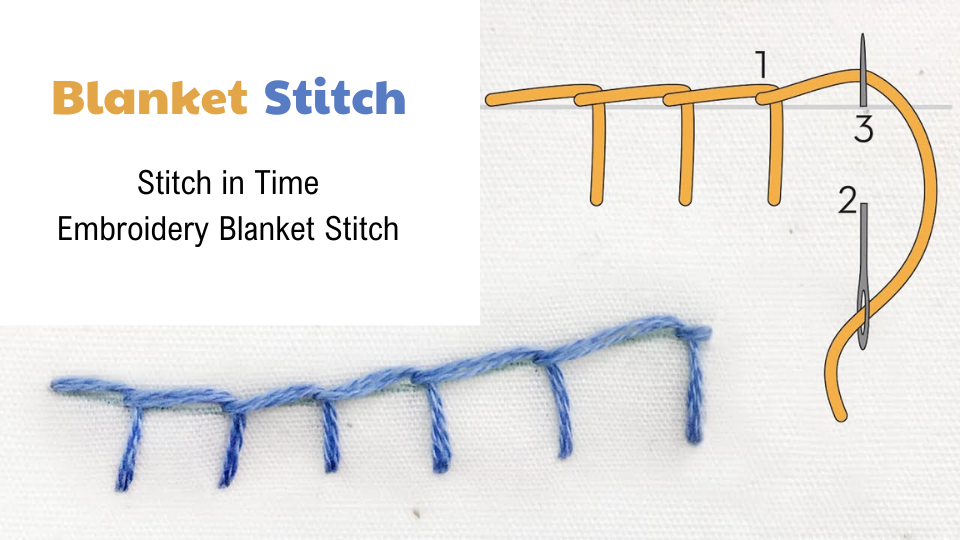
The embroidery blanket stitch is a versatile and robust hand-stitching technique primarily used to create durable and decorative edges on fabric. This stitch not only prevents fraying but also adds a beautiful, handcrafted finish to blankets, quilts, and a variety of textile projects. Its distinctive looped edge makes it easily recognizable and a favorite among crafters.
Tracing back through history, the blanket stitch has been a staple in needlework for centuries. Originally, it served practical purposes in tailoring to reinforce the edges of thick woven fabrics like wool. Over time, its usage evolved beyond functionality to become a key element in decorative needle arts across different cultures. This stitch’s significance in needlework lies in its simplicity and efficiency, making it accessible to beginners yet still valuable for experienced embroiderers.
As we delve deeper into the details and applications of the embroidery blanket stitch, you’ll discover how this fundamental technique has stood the test of time, continuing to inspire and enhance countless creative projects.

Materials Needed for Embroidery Blanket Stitch
Gathering essential materials is the first step toward mastering the embroidery blanket stitch. My years of threading needles and pulling stitches through fabric have taught me that each material plays a pivotal role in the project’s success.
In embroidery, the thread makes a significant difference. For the blanket stitch, a robust and visually striking choice is essential. Embroidery floss or pearl cotton stands out as ideal options, offering thickness for visibility and flexibility for managing tension. The colors of the thread can turn a simple piece into a rich, textured masterpiece.
The needle is equally crucial. A sharp embroidery needle with a sizeable eye accommodates thick floss and glides through fabric effortlessly. From personal trials, a size 24 tapestry needle has proven optimal, balancing manageability with functionality.
Fabric selection is critical, with different textures affecting both the project’s aesthetics and its execution. For those new to stitching, wool felt or medium-weight cotton is advisable. These materials prevent puckering, forgiving any slips or errors while providing a sturdy base that enhances thread movement.
In my experience, ensuring your fabric matches the thread and needle in terms of quality and compatibility is essential for both the enjoyment of the crafting process and the longevity of the finished piece. Each element contributes to a more beautiful, durable embroidery blanket stitch project.
How to Start Embroidery Blanket Stitch
Firstly, prepare your needle and thread. I typically use a length of embroidery floss about 18 inches long, as it’s manageable and minimizes tangling. To begin the blanket stitch, anchor your thread at the edge of the fabric with a small knot or by weaving the tail under your initial stitches to secure it discreetly.
Create your first stitch by pushing the needle from the back to the front of the fabric, about a quarter-inch from the edge. Pull the thread through, leaving a small loop on the edge. As you bring the needle out again for the next stitch, ensure it goes through this loop before tightening. This method locks each stitch neatly and provides a uniform, decorative border.
Tips for Maintaining Even Stitch Lengths and Spacing
Consistency is key in achieving a professional look. I maintain even stitch lengths by using the tip of my thumb as a quick measure, moving it along as I stitch. For spacing, a small piece of cardboard cut to the desired width can be used as a guide between stitches. These personal techniques help ensure that each segment of my blanket stitch is as uniform as the last, contributing to the overall neat appearance of the project.
Common Variations of the Embroidery Blanket Stitch
The embroidery blanket stitch serves not only as a sturdy edging but also as a springboard for creative expression. Over time, I’ve explored and adapted several variations that each bring a unique flair to any textile project.
Exploring Different Styles and Their Applications
One popular variation is the buttonhole stitch, which closely resembles the blanket stitch but includes a tighter loop that’s perfect for buttonholes. This stitch ensures that buttonholes are robust and elastic, ideal for areas subject to frequent pulling.
Another interesting variant is the closed blanket stitch, used for sealing the edges of two layers of fabric together. This is especially useful in creating pockets or adding a decorative layer to a project. The result is not only functional but aesthetically pleasing, enhancing the texture and depth of your work.
How to Adapt the Basic Blanket Stitch for Creative Designs
Adapting the basic blanket stitch can turn simple projects into eye-catching pieces. For example, varying the length and spacing of your stitches can create a scalloped edge that’s perfect for tablecloths and curtains. I often incorporate beads or small buttons into each stitch for added ornamentation, which is fantastic for decorative pillows or a child’s quilt.
Each variation of the blanket stitch allows you to tailor your sewing projects to your functional needs and artistic preferences, making this stitch incredibly versatile and rewarding to master.
Projects to Practice Your Embroidery Blanket Stitch
Once you’ve grasped the basics of the embroidery blanket stitch, applying it to various projects can vastly improve your skill and add flair to your craft portfolio. Here are some projects I’ve tackled that range from beginner-friendly to more creatively challenging.
Starting with straightforward projects is an excellent way for beginners to gain confidence. One of my first projects was creating a set of coasters. Using wool felt, cut into simple shapes like circles or squares, allows for easy handling and stitch application. These small items are quick to complete and provide a satisfying sense of accomplishment.
Another great beginner project is a bookmark. It’s a practical item that requires minimal fabric and thread but allows for ample practice of the embroidery blanket stitch. Plus, bookmarks make thoughtful gifts or craft fair items.
As your skills develop, more complex projects can provide new challenges and opportunities to express creativity. One project I found rewarding was a decorative throw pillow. Integrating the blanket stitch along the edges with embellishments like beads or additional embroidery patterns takes more time but results in a unique and personal home décor item.
For those looking to really test their skills, designing and stitching a custom fabric tote bag can be the next step. This project requires managing larger pieces of fabric and potentially mixing different stitches for aesthetic and functional purposes. The blanket stitch serves excellently in attaching pocket edges or giving the bag a finished look.
Troubleshooting Common Problems in Embroidery Blanket Stitch
As delightful as working with the embroidery blanket stitch can be, beginners might encounter a few hurdles along the way.
One frequent issue many beginners face is uneven stitch lengths, which can detract from the overall neatness of the project. A simple fix is to mark small dots along the fabric edge with a fabric marker before you start stitching. These marks serve as guides to keep each stitch uniform.
Another common problem is the thread tangling or knotting as it’s pulled through the fabric. To prevent this, I suggest using shorter lengths of thread. While it might mean more frequent thread changes, it significantly reduces frustration and maintains the flow of your work.
For the embroidery blanket stitch to be both durable and neat, tension control is critical. If the thread is too tight, it can pucker the fabric; if too loose, the stitches might not form properly. Practice maintaining a consistent, moderate tension, and soon it will become second nature.
Additionally, to enhance the durability of your stitches, especially on items like blankets or clothing that will undergo frequent use or washing, consider using a thread conditioner or beeswax. Running your thread through these before stitching can help strengthen the thread and reduce wear over time.
Enhancing Your Embroidery with the Right Equipment
Choosing the right tools can profoundly impact the quality and enjoyment of your embroidery projects. While the embroidery blanket stitch can often be done by hand, incorporating a quality embroidery machine opens up a realm of possibilities, especially for more complex designs.
Machines allow for precise, consistent stitching that’s difficult to achieve by hand. They also significantly speed up the process, which can be a blessing on larger projects like quilts or detailed garment decorations. Using a high-quality machine ensures that the embroidery is not only beautiful but also durable, with each stitch perfectly placed and secured.
Selecting the best embroidery machines for beginners is crucial for those new to this craft. With the right embroidery machine, even beginners can tackle ambitious projects with confidence, producing results that are both professional and personal. Investing in quality equipment is an essential step for anyone serious about exploring the full potential of embroidery.
Conclusion
Mastering the embroidery blanket stitch offers numerous benefits, from enhancing your crafting repertoire to adding personalized touches to everyday items. This fundamental stitch not only serves as a robust starting point for beginners but also forms a base from which to explore more intricate and varied needlework techniques.
As you grow comfortable with the embroidery blanket stitch, I encourage you to branch out into more advanced techniques and projects. The skills you’ve developed will serve as a foundation, allowing you to tackle complex designs with confidence. Whether you’re interested in creating elaborate textile artworks or customizing your clothing and accessories, the world of embroidery offers endless creative possibilities.
Embrace the journey of learning and discovery in embroidery, and remember that each stitch not only adds to your project but also enhances your skill and creativity. Let your needle and thread lead you to new artistic expressions, and enjoy every stitch along the way.

